Showing posts with label for the home. Show all posts

Tuesday, July 29, 2014

The Shed


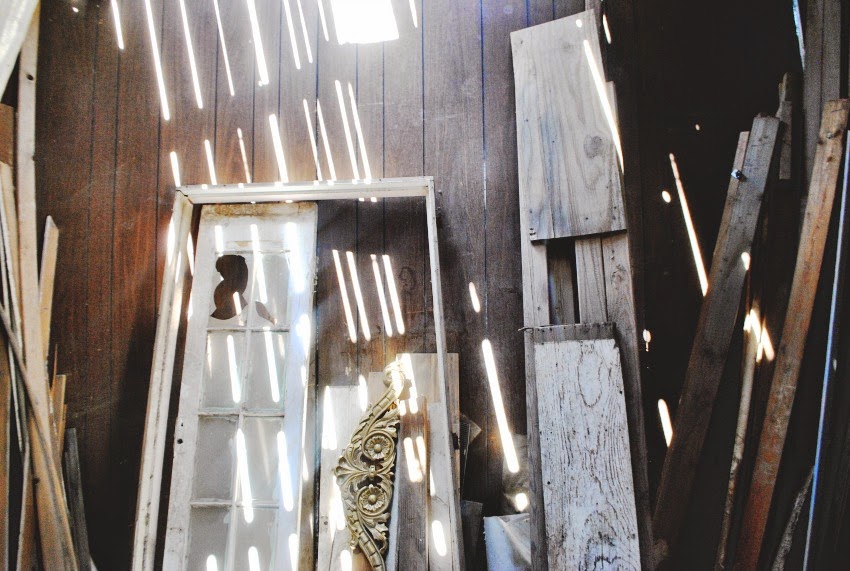
So, just kind of a random post.  We have this janky OHLD shed in the backyard that I've really grown rather fond of.  I've always had a fondness for old things that I can treasure hunt in.  As a kid I would go into a dusty old junk shop and imagine the Neverending Story book was hidden in there somewhere.

I fancy myself a pirate in that way - always searching for the hidden treasure.

Our landlord gave us free reign of this place!  Yay.


Of course, the thing that pops out to you must be the old window.  I haven't done anything with it yet.  :/  It's sort of funny, I am very fond of them, but when you live in an old house, there are plenty of old paneled windows like that - and adding one more feels like overkill.


Found those beauties.  Feel free to be jealous.


Some cool old plates.  I'm sure something will come of them one of these days.  Right now they just sit in the 112 degree heat out in that shed probably wishing they could die.  Or not - cuz, you know...they're hardware.


I found this crate type thing, and use it on a shelf to display a lot of our printed Instagram photos.


And then there's just these unexpected blue beams bracing the roof.  What is up with that and how cool, eh?
That's my color.  How did they know?  ;)


Monday, May 12, 2014

it is unexpectedly, beautifully white and begs for no color

We do still have a lot of stuff, that's for sure.  It's hard to be a crafter and a DIY-er without it.  Once you throw away that spool of vintage mustard colored thread it is a sure bet that it is exactly the color that matches the mustard corduroy pants you're trying to patch.

It doesn't really bother me - I've never found a comfortable seat on the extreme minimalist's bandwagon.

I know that "stuff" doesn't make us happy, but I just don't buy that it makes us unhappy either.


But boy, you sure are forced to look at your stuff when you have to pack every little paper clip, playing card and shishkabob stick to move across the state.  We had to give away a lot of stuff.  Some of it stung.  Some of it made us just laugh and gaffaw at the idea that we even owned it in the first place.  And all of it probably needed to be gone.

But this new house loves it.   I don't know what it is about this house - and I have to wonder if I just have a mother's eyes for it but this simple home loves the simple decor.


It's the professional model that you see featured in a magazine without her makeup and realize she is more beautiful natural.  It is the bare chocolate cake that you're hesitant to taste because it lacks frosting and sprinkles - yet ends up being the best cake you've ever tasted.  It is the small bundle of daisies picked from a wildflower field when you thought you liked red roses.

It is unexpectedly, beautifully white and begs for no color.  It is mostly stone and wood and wears natural ivy around its neck.  It is simple, and natural, and close.  Most importantly, it feels like ours (for now), and I am very grateful for it.


Wednesday, October 23, 2013

Kitchen

Hi guys!

Thanks for coming back for the kitchen portion of the home tour.  Our kitchen is right in the "heart" of the home (right smack dab in the middle).

I like it being right in the middle of the house.  If you're going to have one room at the heart of the house, it's gotta be the kitchen, right?  Or should it be in the stomach of the house?  Anyway...it's not at the gross stomach so stop saying that.  It's at the heart, and it's passed through every time we have to potty or go on the computer or tell the dog to stop barking at people walking in the alley way...it gets a lot of traffic (and I painted the floor white - I'm a genius.)

But alas, I am very pleased and blessed with the way it turned out...you know...3 years later!  :)  Here's a before and after for ya:


This print above came from the very talented Shelli Dorf on Etsy.   Check her out.  She has such sweet, whimsical prints.  I also have to say I was very pleased not only with the print itself, but the service.  It arrived on a rainy day, and the mailman had left it sticking out of the mailbox.   I panicked a little as I opened it, and I was sure it was ruined.  What I found when I opened the envelope was a very tightly sealed second plastic envelope.  Not a drop on the print.  I was so thankful for the extra effort.

The frame above was a quick, cheap yard sale find that I wrote about here, and the writing inside it says, "Making soup is fun."  It's one of the first thing our wee-est one made in kindergarten, and it resonated with me.  I mean, who can argue with that?


Phooey!  We forgot to get one from the very same angle (above), but you get the idea.  I did write about the red sliding barn door, and it's been so handy.  It's pin on pinterest is also my main source of traffic into the blog. I love people - they all love a good, cheap, easy DIY just like me!

The above light is from Rejuvenation lighting, and I highly HIGHLY recommend them.  They have so many period piece lighting for older homes, and even a feature on the website where you can find the lighting that specifically matches the lighting that would have been common for the year that your home had been made - which is what we did here.  Our home was made in approximately 1920, and this is the type of light they would have used at the time.  Except I got it in red - which is sassier than for a light than the 1920 lights. And what should a light be, if not sassy?


 This kitchen "island" is made from my childhood dresser.  It is the dresser that matches the mirror in our living room I wrote about here.

I would like to go off on a tangent about this dresser, but I think I can milk a whole other post out of it, so that's what I'm going to do down the line.


I just recently added this little addition of the instagram prints to the refrigerator.  I kind of want to chuckle a a little and say, "Welcome to my Pinterest kitchen".  This is definitely an idea I stold directly from pinterest - no holds barred.  But, can I be a hipster jerk right now and just say I had a chalkboard and a dresser in here before Pinterest did?  (No?  That's not classy, right?  Okay, I didn't say that then.)

And that's, as they say, that - for the kitchen. (Why do I always want to say, "See you next time" at the end of my posts like I'm hosting a monster movie of the week on television?)   I need a catchy tag line to end every post without having to think about it so hard.

"See you next time for some new tasty fig milkshakes?"
"I think we've had our FILL of fig milkshakes for now.  Let's throw out our empty paper cups and..." No that's no good.
"Sa la vie and farewell and parting is such sweet sorrow, but alas we will meet again...when the....moon...." Erm...that doesn't work either.

Any ideas?  Anybody?

Smell ya later.

Tuesday, September 18, 2012

Thrift Store TV turned Frame

Hello, hello!  

Today I thought I'd share with you guys this old tv I turned into a picture frame. 


 A loooOOoooong time ago I found this old tv for $2 at a yard sale.  It was heavy and from the stone age.  I didn't even check to see if it worked, but I just loved the retro look of it, so I grabbed it up knowing I could eventually use it for something cool.

Although this ended up taking quite a bit more time than my usual projects, just because it took forever to properly "Hulk" this thing apart - the gist of it is really quite simple, and I'm sure it wouldn't take you nearly as long as it took me.

I started with this:


Time to perform delicate TV SURGERY.

                                                                      Scalpel, please....

                                                              Oh the HUMANITY!

                        Hey, this says "UHF"!  Do you guys remember that movie with Weird Al?

                                           I'm afraid this tv will never show PBS again.

 As you can see, I used whatever tools I saw came up that I needed.  For me, that ended up being a mallet, a chisel, a screwdriver, and pliers - but I'm sure each tv is different and might require different tools.

Then with the remaining front piece, I bounded indoors and started the crafting:


Instructions:

1.  Cut your glass to fit (leaving a little extra for hot gluing the sides down).  Take it from me, use a thick piece of glass.  I thought I could get away with buying a Dollar Store frame and using the glass from that (as pictured), but I went through EIGHT PIECES of glass this, and in the end, I got a 1/4" thick pane from Home Depot, and cut with help from this video it in one try! 

2.  Hot glue the glass to the inside of the tv frame - into the corners where it will not be visible from the other side of the frame.


3.  Cut your picture to fit and lay it on top of the glass.  I had to tape mine down a tad.
4.  Then I cut out a piece of poster board to fit the back, and tied a wire to hang it in the future, but you can do whatever suits you - maybe you just want it to sit on a shelf and don't need the wire, or maybe you don't need a backing because it doesn't bug you that there's no back, but here's what I did:


And here's one more peek - hope you like it:


I'm linking this project up at:

 Sugar Bee Crafts for their Take-a-Look Tuesday
 &  Coastal Charm for Nifty Thrifty Tuesday 
& Funky Junk Interiors for her Saturday Night Special Party


Tuesday, September 11, 2012

Copycat Owls

So, yesterday I blogged a little about fall decorations, and today I'd like to share this very inexpensive and simple thing I did to decorate for fall.

As I talked about a little yesterday,  my personal preference for decorating for the seasons is to do keep the cost and efforts low.  Although some of the more beautiful ideas out there are the intricate ones...I don't really feel I have the time to do something elaborate, or the space to store it for the rest of the year - so I really try to keep decorating for the seasons simple.  (That must be where I get my nickname, "Simple Amy", right guys?  RIGHT?!)

Here's one thing I've done to decorate for fall.  It was very simple and very cheap, so that's right up my alley!  (That's why they call me "Cheap and Simple Amy"...RIGHT?!)

I started with some cute Dollar Store owls.  I bought all three they had.  Having the whole set will make a better impression than just one.  This thought process is derived of one of the main rules of decorating.  As I hear experts tell it...collections displayed together make more of an impression rather than scattering them across the house.  Have you noticed all the pins on Pinterest of picture displays?  A collection of pictures grabs your attention more than just one. I find this is true for most household collections.


Now, these owls are pretty cute just as they are, but I found them to be a little childlike.  They might go well in a kid's room, but I thought painting them white might class up the joint a little.

Again, I don't really have any "instructions" per say, because the project is so simple:

I painted them, dude.  I did it outside.  I did about three light coats (to prevent dripping), and I used a flat sheen.

Here they are!
 

And what do you guys think?  Should they go here on the bathroom windowsill?  ---->


Or here in the living room using that rule of thumb for displaying collections together?


Here's some others I found online comparable to this humble project.  They differ a little, but I think this project is definitely worth it considering I saved up to $50, judging by the price tags on these!


 Above: Urban Trends Ceramic Owl Set $50


You could also very easily buy some silver paint and do something like this:


West Elm's Owls $51 for three.


There you have it!

I'm linking this project over here at  I Gotta Create!
& over here at My Uncommon Slice of Suburbia for their Tuesday's Treasures Link Party


Monday, September 10, 2012

Well, Let's Talk About Fall Then


Phooey - I am still having trouble uploading photos.  I had my heart set on blogging about this fall craft I did today, but instead I will have to rely on photos already on my computer to satisfy my blog lust, until I can get out to pick up the piece I need.

So, let's talk fall.

Are you guys doing anything to decorate for fall so far? I am seeing so many great ideas and many of them cost little to no money.  I love the idea of bringing branches from the outside in, and decorating with pinecones and acorns.  I also love the idea of painting a pumpkin instead of carving it so it lasts longer and brings some color to your home.  I pulled together a collection of some of my favorites.   

I tried to pull things that aren't already swarming Pinterest so we could all enjoy something we haven't seen before.  If you do pin, please pin from the original source (provided that blogger is "pin friendly", and I find most are.)...you know, unless the original source is a big corporation like Martha Stewart...you know, the ones who too busy and rich to sue me or even send a threatening e-mail.

The blog link is directly below the image.  I hope you enjoy your eye candy corn!


Fall Leaves Garland from A Beautiful Mess Blog


Danielle's Pretty Fabric Pumpkins from Design Sponge  I think these would make really cute pillows for your bed in Autumn.


Pretty Painted Pumpkins from Carosello


Painted acorns by Mod Podge Rocks


Pumpkin House Numbers via Sunset


Simply bring the outdoors in (previous two pictures) from BHG 


Mantle with fall bunting by Jenny Erb


Painted Gourds cut into Bowls from Martha Stewart


Autumn Amber Bottles and wheat from Centsational Girl


Gilded Pumpkins from Country Living

Thursday, August 9, 2012

Before and After Pictures

Hi everybody!

Well, my computer isn't currently uploading pictures.  I had a great craft "how to", but it looks like it will have to wait until I can figure out what this computer wants from me!

For now, I thought I'd share some before and after pictures of certain parts of the house.


Boy, I wish I had snapped more pictures when we first bought this old house!  If you just bought a project home and can't wait to get around to renovating it - listen to your good friend, Amy, and take the time to take lots of pictures before you get out the paint!  I just couldn't wait to start working, and now I totally regret not getting more "before" photographs.

Here is what I can give you with the photos that I already have stored.

BEFORE (pic below) I think the walls were meant to be white, but years of the previous owners smoking inside the house turned them an unpleasant grayish.  The lighting was outdated, and the trim was dark red.  Really sort of an unfriendly color.   I think it is in part due to this color combination that people would take two steps in the house and immediately get the feeling it was haunted.  :)


 AFTER (pic above) After many half slept nights, we came to the look you see above.  The color is BEHR's "Pale Honey" - I remember because we joked that it reminded me of my husband (who is also my pale honey - yuk yuk).  The color in the back room is "Pumpkin Patch" - a name we have also come to call the room itself .  The orange was sort of a risky color, but we loved it instantly and it grew on anyone who didn't like it at first.  As you can see, we upgraded the light.  The hardwood floors remain untouched, (we find them beautiful the way they are with their 100+ year old character - scratches and discoloration and all...).  Now, it took about four coats of white paint (a color called, "Pillar White"), and a lot of painters tape - but we finally painted that trim (that was previously red) white.  Not an easy feat with all those panels of windows, but well worth it. 


So that's the living room area, here is the dining room.

BEFORE (pic below) The biggest challenge in this particular area were these crazy shelves you saw just as you walk in the door.  They had a mirrored back...and triangular shaped shelves that came out.  It sort of reminded me of an outdated old lady curio cabinet.  Not the classy kind, but the kind with snow globes from the gas station around the corner and dust piling up in it for the last 4 years.  I had no idea what this could be used for, so it had to go.


AFTER (pic above):  I "Hulked" out the whole thing.  Amy smash.  Where there once was awkwardly placed mirror, I stenciled a cheerful but classy (if I do say so myself...) damask patterned back.  Now it serves as a sort of plant stand. You have to imagine a great plant there since I am pictureally challenged right now.  I do have a picture of the plant on my  Becky's Chalkboard post. It's one of my favorite redos of the home so far.

And here's one more picture of the area after it was painted, and the light fixture had been replaced.


I must admit, it doesn't look quite as clean right now.  Time to stop blogging and go care for this home I am ridiculously blessed to live in.

Ciao, dah-lings!  (See, that's what happens when you live in a beautiful house.  You get a big head and start talkin' fancy.)